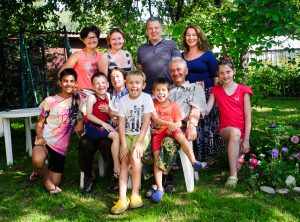
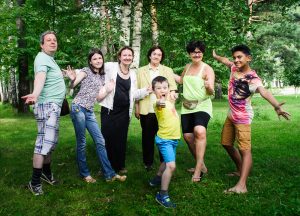
I’ve just returned from Moscow, where I was spending time with my family. My family is very small, and we are all very close. We get to see each other about once a year, so these moments are very special. This time it was even more special, as my brother in law’s sister was visiting with her children from Holland. We have not seen each other for about 10 years, but this year we were all in Moscow at the same time.
A group portrait of the entire family is a wonderful thing to have. We all gathered in my sister’s summer house, and as expected, there was nobody around to take a photo of all of us. We had no choice, but to do a “selfie”. I have set my camera up on a step ladder and after lots of begging and a few attempts, we managed to get a pretty good shot, capturing a happy and relaxed Saturday summer day…

I can imagine that many people face a similar challenge, hiring a professional photographer is not always practical, or even possible, yet they would like to have a record of a special moment in their family history.
I thought my tips could be helpful to anyone who needs to do a DIY family portrait, and this can apply to groups of any size.
- Prepare and warn everyone that you’ll be taking photographs
Lots of people don’t enjoy being photographs, and can be rather difficult when you ask them to take part in a shoot. Doing some mental preparation beforehand can make a big difference. We had to do this with our mum, warned her several times in advance that we’ll be taking taking photographs of all of us together. It actually worked!
If you can get your family members to get colour-coordinated clothes, you can get an even better result. We did not do it, and we’ll still love looking at this photograph.
2. Find a suitable location
When you are planning to do a group family portrait, you need to have a place with enough space and good lighting. If you are doing it under the trees, make sure everyone is equally in the shade, and nobody is directly under the sun. Sometimes it’s not possible to have it absolutely perfect, just do your best!

3. Allow special dedicated time for your session
A good group shot never happens from the 1st attempt. It’s important to set some time aside for the session, so you are not rushed. The more photos you take, the higher are the chances of getting that perfect one. We had another “selfie session” with my immediate family, with the camera placed on a picnic table, and it took a while before we managed to get everything right, but the result is well worth it!

4. Work out how “timer function” works on your camera or phone
Most cameras and mobile phones have a “timer” function, so you can set-up the camera to fire with a delay. Usually 5 or 10 seconds is enough. You can increase the delay, if you need a bit more time to get back to the group. Find somewhere to place your camera/phone, where it can be safe and stable. It’s best to have it at the level of your waist. You also need to make sure that everyone can be seen in the shot.
5. Take lots of shots & enjoy!
You got everyone together, the camera is set-up, so now you need to get everyone to look in the camera and look happy! It may need a few goes before everyone will do it, so keep trying!

Don’t just stick with one pose! move round, do different things. It’s nice to have some variety, from moody to silly looks. One of this tricks is to all say something funny out loud, or do something together, like clapping hands or tickling each other.
